How to make a portable LED backpack sign!

This post is going to be broken up into a few different parts.
- Parts Used
- Wiring up and assembly
- Software/Media used
- Lessons learned/Tips
I really try to go in depth in this post and spill all the secrets to the project. I use a lot of ()’s throughout the post and these should be read as side notes. These are to add a little bit more detail or anything else I think is important to note.
Here are a few pictures of what I’ll be showing what to make. (The refresh lines are not noticeable in real life since it is running around 70-80 hz or so)
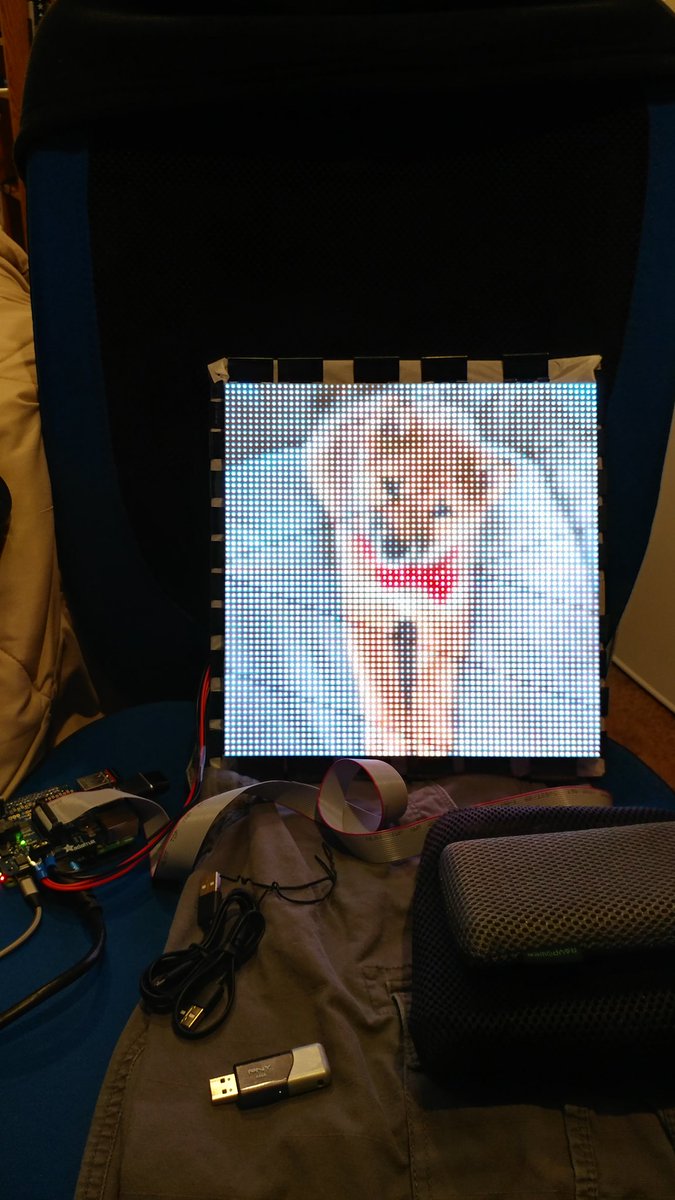
Before I describe the parts and software, note that there are two different versions of this project. There is a 64×64 version which can be seen above and a 32×64 version which can be seen below. The 32×64 (will refer to 32 from now on) was the original version that I made for Defcon 2016 and the 64 was the upgraded version for Defcon 2017.
One last thing to note. This post assumes that you are going to be doing the 64×64 version (I’ll also show you what you need to make the 32 version), and that you will be taking this display project mobile (on a backpack or something of the sorts). If you don’t need to be mobile, then just buy the parts that make sense for you. For example, you don’t need a battery pack if you’re going to be plugged into a wall socket.
Part 1: Parts Used
I will list the parts here and go more in depth on each one later.
Raspberry Pi 3: https://www.adafruit.com/product/3055
64×32 RGB LED Matrix: https://www.adafruit.com/product/2278 (Need 2 of them if doing 64. I would recommend the 3mm pitch, which means there is 3mm between each LED rather than 4mm which this one has. It is much easier to see the picture being displayed at a few feet distance with the smaller pitched panel)
Adafruit RGB Matrix HAT: https://www.adafruit.com/product/2345
Battery Pack with AC Outlet: This one is the one I use (Only needed if doing the 64)
Battery Pack for the Pi: This is a good option (This can power the Pi and a 32 display if you are not doing the 64 version)
Some extra parts:
The following links are mostly from Ebay. I’ve included the full names so you can search them up if the exact listing goes away, which often happens as time passes.
2.54mm Pitch IDC 16-Pin Dual Female Connector Motherboard Flat Ribbon Cable Wire (This goes from the HAT to the display. Need 2 if doing 64 and 1 if doing 32)
USB 2.0 A into to 5.5mm x 2.1mm DC Barrel Connector Jack Power (This is needed if doing 32. This will go from the battery bank into the HAT to power the display)
KNACRO AC 100V-240V to DC 5V 10A 5V/10A 50W AC Switching Power Supply Adapter (This is needed if doing 64. Any 10 amp 5v power supply will do)
3M Dual Lock Reclosable Fastener SJ3560 250 Clear (This is very helpful if you want to mount the display to you backpack or the wall. It can hold up to 5lb or so. Much better than normal Velcro)
Wireless keyboard (This is a must-have if you plan to go mobile with this project. I use the one linked because it is small and has a mouse pad.)
Part 2: Wiring up and assembly


This part is pretty easy. The Pi Hat is probably the hardest thing to assemble here. It comes un soldered, which is no biggy for most hackers/techies. Once soldered, just put it on top of the Pi and you’re halfway there. Next, hook up the power cables and data cables. (If you are doing the 64 project, make sure to hook up the second data cable and power cable from the first panels output into the second panels input.) There is an input and output on each 32×64 LED panel, so make sure you’re plugging in the right one.
The second-hardest part is making the mount for the two panels. If you are only doing the 32 project then this is a breeze. Just put some of that super Velcro on the back of your panel and backpack and you are good to go. I used super glue on both my backpack and panel to make sure that it stayed on. I had no problems keeping the Velcro attached to either my backpack or the panel. If you really want to be extra sure, then attach some string to the back of the panel and tie the other end around the handle at the top of every backpack.
If you are doing the 64 project then some DIY is in order. I cut out two pieces of strong cardboard and super glued them together. Then I cut out the holes where the data and power cables go (make sure to cut the holes a little bit bigger than they appear to make putting the cables in there easy. I then put some of the Velcro on the back of the cardboard and LED panels (with the help of some super glue of course).
One optional thing that you can do to make the display easier to see is to add some kind of diffuser. As seen in the picture I used some parchment paper that I put very tightly over the top (You will probably need an extra pair of hands for this). I used some document clamps (or whatever the proper name for them is) to hold the parchment paper down then removed the two silver hands to make it were they can’t be removed (I think I had one slip off, but the rest work just fine).
Part 3: Software/Media used
This next section is probably the most important since hardware is nothing without the software to control it. The software that and tutorial that I used for the 32 version can be found here on adafruit but the 64 version is a little bit more complicated. The software they provided was a fork of the original software. I am not going to go super in depth because the documents, that can be found here on github, are quite amazing and explain it much better than I could. I would recommend looking at my code as a template to see what each command and part does. I will go into detail on why I chose each of the commands I did.
Let’s look at a simple Nyan Cat gif that only has 4 different pictures.
(Files can be found on my Github here: https://github.com/arces/Led-Matrix-Display-Resources/tree/master/nyancat)
“Sudo ./led-image-viewer” -This calls the program that runs the LED’s
“–led-gpio-mapping=adafruit-hat-pwm” -This tells the software that we are running the adafruit pwm hat
“-L” -Means large display. This is VERY important because it tells it that a 32×64 display is on top of the other display and not next to it. It does some magic and flips an image around and sideways.
“-f” -Cycles through the images till we stop it.
“-w .09” -The time between the next image. I like to control this manually because some gifs go to fast to see them properly on the display
“0.gif 1.gif 2.gif 3.gif” -This tells the program to load these gifs and to use them to cycle through.
“–led-brightness=70” -What percent to set the display to, 70 percent is very bright and the lower it is the better if you are trying to save battery.
“–led-pwm-lsb-nanoseconds 300” -The higher this number is the lower your display will refresh at. This is important to play around with because of two reasons. The Pi3 is very powerful and can push a few hundred fps to the 64×64 display which will cause artifacts and glitches to appear so we need to throttle it, and second, the lower the refresh rate (around 60-80 hz is good) the lower the battery usage will be.
You can find all the command here on github, there are many more useful ones like “–led-show-refresh”
The only files in the Nyan Cat folder (if you are doing the 64 version) is the following:
- 0-3.gif
- led-image-viewer
- run.sh
The rest of the files are for the 32 version of the project. test.py uses the adafruit fork of the LED driver software and needs “rgbmatrix.so” as well as led-matrix. The ZIP file is the separated gifs that are not renamed to 0, 1, 2, 3…
So, now you should be able to run the gifs or pictures by themselves, but what about multiples of them?? This is where this little script comes handy. This is version 2.0 that runs the 64×64 display. The 1.0v script was written with help from Leo Tindall who is a great programmer and open source contributor, check out his blog/website at https://leotindall.com
This script is written in Python 3. In order to run it you type “sudo python3 test.py” and it will run all of the “run.sh” in the folders that you specify in the “folder_names” var. If you want to change the time between changing folders then just change the number on line 33 from 15 (15 seconds) to something else. For the 32 version of project all you need to do is call the test.py in each folder as another process and then kill that process after a set time.
Now you might be saying “What the heck, why are you using the kill command?”. I am using the kill command because I am opening up a subprocess to call the “run.sh” which runs as a system level daemon. In order to stop “test.py” you have to run the following (in a newly spawned terminal Ctrl+Alt+T) which I made into a system command.
This Bash script will fully kill any Python process, and it will kill the current led-image-viewer process. If you run just one “run.sh” bash script, and not the “test.py” you can just close it with a “Ctrl+C”.
So now that we have all the software we need some gifs. You can use the ones on my github repository or go grab some that have the right aspect ratio as our new display and doesn’t have to many small details. Remember that it will be resized down to 64×64 pixels which does not allow for to many details.
After you have found the images or gifs of your choosing I would highly recommend www.ezgif.com/ to resize, split or create gifs for your display. I used it in every single image since it was very easy and completely online. The only thing is that when you split a gif (especially large ones) you will have to get creative for naming the images since doing 200+ by hand is no fun.
Part 4: Lessons learned/Tips
The easiest way I have found to run the display when it is in my backpack or when there is no HDMI/Screen output is the following (assuming you have set everything up properly and followed all of my directions).
- Pop a new terminal (Ctrl+Alt+T)
- “cd Desktop” (Or where ever you have your folders and scripts)
- “sudo python3 test.py” OR “sudo bash run.sh” (Depending if you only want to do one sequence or all of your folders)
- Pop a new terminal and run “sudo cu” (This depends on if you moved the cu script to be a global command and if you are running test.py) OR if are running “run.sh” then just press Ctrl+C to close it
A possible easier way of displaying gifs is to just tell the program to run the whole gif, without having to split up the frames individually. I never did that since I usually work on this project a week before Defcon and don’t have much time to investigate this feature. This could potentially cut down on the prep work and the code complexity.
There are also ways of feeding the screens data to display such as stocks, bus times, and possibly even BTC/Crypto Prices. This could be a pretty cool “retro” use of the displays since it would be MUCH easier, but not as cool, to connect a Pi to a cheap monitor and have it run a webpage with live prices.
If you look for these displays on Ebay they are around a third of the price since I believe that the design is open source. I cannot vouch for the quality of these but if price is a big factor then give them a shot. Usually Ebay sellers have a good rep and will accommodate you, especially if something fails, Ebay is not very forgiving to sellers who sell broken or fake items.
Part 5: Thoughts
I think this would be a fun project if you like hardware and software. I found it very fun, all though frustrating at times, and it really makes you learn Linux, the Raspberry Pi, as well as Bash/Python scripting. I learned quite a bit about daemons, the kill command and how to monitor subprocess when I spent a couple hours debugging and coding a solution that would work. Also if you use this tutorial to help you create your own unique design or way of controlling the pictures then you will get a good lesson in creativity and problem solving. I thought long and hard about different ways of mounting the display to my backpack and ways of powering/controlling it.
If you have any thoughts or create your own display then tweet at me @starfox707. If you need help then feel free to DM/Tweet me and I will give it a go!
Best of luck and have fun.
One Reply to “How to make a portable LED backpack sign!”